|
Prelude Twelve students, one fermentor and one hell load of cells…. Ever drank Yakult or eaten Yoghurt before? Ever wondered how they are made? If you have those questions in mind, then you have come to the wrong place because we are not going to tell you how Yakult or Yoghurt is made. But wait! Don’t click that little box with an X yet… Why? Because we are going to share with you something more interesting then how Yakult was made. We are going to share you a not-so-secretive trade secret; a process that has been handed down by our long lost forgotten forefathers; the process that has churned up so many wonderful products like yakult, yoghurt and the ever wonderful beer… FERMENTATION So stay a while and listen... ------------------------------------------------------------------------------- Not So Long Ago… For most of us in the team, I think this is most probably the second or third time we had carried out fermentation experiment. I can still remember the last time when the class did a fermentation experiment. We were making yoghurt. All we did was to add some “fresh” milk and a scoop of starter culture into a flask and left in an incubator to ferment. Fast, and also simple. But not this time. The fermentation process that we carried out this time was away different from that previous yoghurt experiment. This time there were more steps to do, more calculations to think about and also much more time spend on it. So being a really nice group, we have set up this blog to share you what we did and also explain to you what actually happen during the whole process. Click Any of the links below to find out more. “Bioreactor: The stirrer within” “Mummies Guide to Making Broth!” “Dummies guide to bioreactor setup” "Seeding" “To the I, to the F, to the M” "Graph it Out" “Prison Break 101: How to break a cell” ----------------------------------------------------------------------------------------- Bloopers  
We have spoken.
[Day 1] Bioreactor: The stirrer within Objectives: To familarisation with the Bioreactor and its Operation Procedure: As a group, study the different parts of the fermenter below and label the parts in the diagram below A gloomy day to start with. Looking at piece of machine. but we did learn something called a Fermentor. Look closer into our pictures to learn more. Enjoy. A labelled picture of a Fermentor 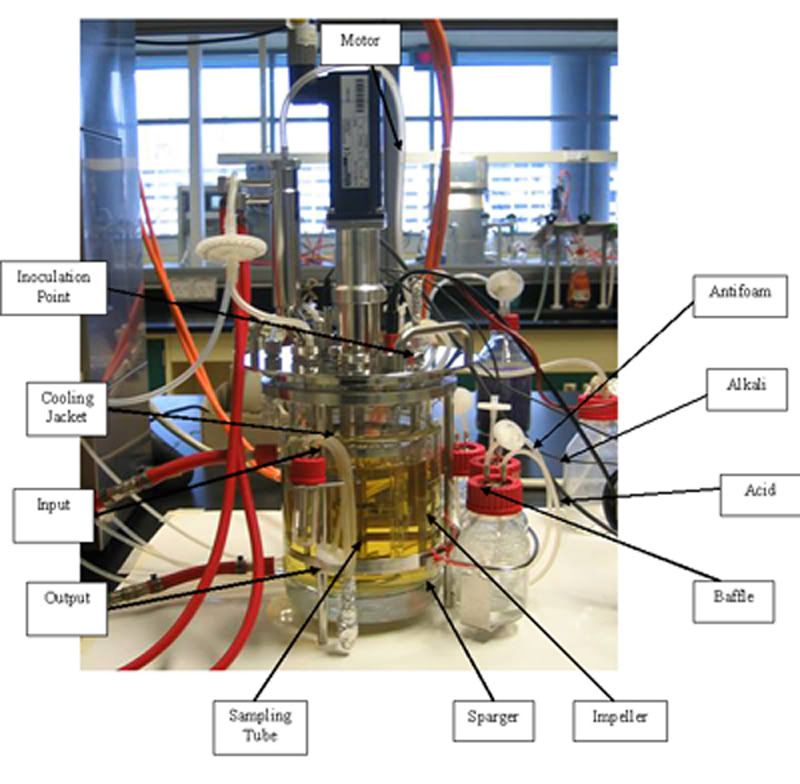 Click to see a clearer Picture. Now what did we learn??? hmmm... 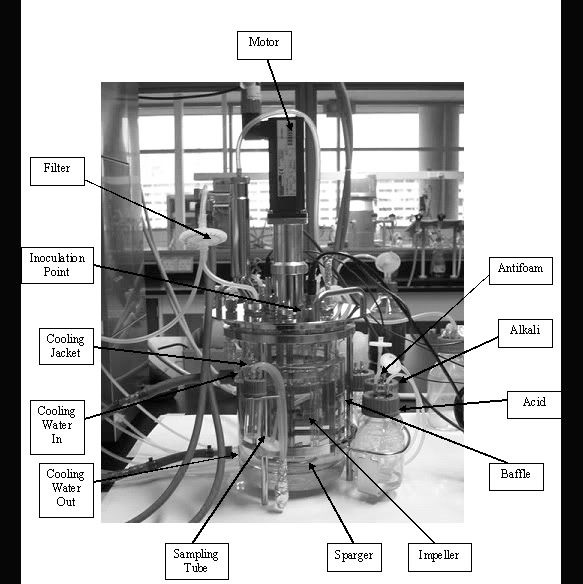 Click to see more clearly. We have spoken.
[Day 1]: Mummies Guide to Making Broth! Objectives: To describe the steps to prepare a bioreactor To prepare the media for seed culture and scale fermentation To prepare the seed culture for scale up fermentation Procedures: 1. Media for Seed-Culture and Scale-up Fermentation Before we actually begin the fermentation process, we have to prepare the media for which the cells will be grown in, the same way you cannot swim in a swimming pool if there is no water inside. Also, unlike us, cells “eat” the media, so we have to make sure that the media has the necessary ingredients for their “all their nutritional needs” *Baby milk powder advertisement voice*.   1. Prepare 2.0 litre of Luria-Bertani Medium (LB),  Indeed, these cells that we grow are very much like  4. Add ampicillin to a final concentration of 100mg/ml  2. Bioreactor Preparation Steps 2. Bioreactor Preparation Steps1. Calibrate the pH electrode using electrode using standard buffer solution (pH 7 and pH 4 or 9 depending on the culture). 2. Install the pH probe, pO2 probe, foam and level probe into the top plate. 3. Connect the addition agent lines for acid, base and antifoam. Check the levels in the storage bottles. 4. Install other accessories such as exhaust condensers, air inlet and exhaust filters and manual sampler unit. Check that the water jacket is filled with water. 5. Prepare for sterilization: i) Disconnect all cables except the temperature probe, which is autoclavable. ii) Clamp all silicone tubings except for exhaust filter and female STT coupling of sampling unit. iii) Cover all filters and sockets with aluminium foil to protect from condensing moisture. iv) Autoclave with steam at 121°C for 20 minutes. 6. Polarise the pO2 electrode for at least 6 hours. Calibrate it by aerating with nitrogen.
7. Connect the addition lines to peristaltic pumps. Switch to “Auto” or “Manual” control appropriately.  We have spoken.
[Day 1] Dummy's Guide: Setting Up A Bioreactor The following would be the rather mundane procedure of setting up the bioreactor. The bioreactor we use is a pretty small one, about the size of the gas tanks that you got in your kitchen. 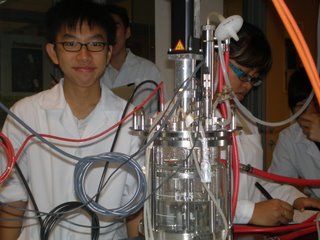 We start off by making sure the pH electrode is  After that, the pump lines for the acid, base and antifoam We have spoken.
[Day 2] Seeding! The bacteria that can produce the product we want is first removed from the freezer. It is then grown on a selective plate (LB/AMP/Ara). “Ara” is short for Arabinose, a monosaccharide that is used as a carbon source for the organisms that we wanna grow. A selective plate allows only the bacteria with the properties we want to grow, as well as to exhibit special properties if they have the genes that we insert into them. Once they have been incubated for a day, a few colonies are selected and transferred over to the flask with the 100ml LM medium. This flask is then left at 32°C for one day so that the colonies that have been put inside the flask can grow. 1. Collect pGLO transformed E.Coli from the freezer.  2. Streak on a LB/Amp/Ara plate with 100mg/ml of ampicillin and arabinose 0.2% and incubate it for 24hrs.  3. Streak colonies of pGLO transformed E.Coli from LB/Amp/Ara plate, and transfer them to the flask containing 100ml LB medium with ampicillin.
We have spoken.
[Day 3]: To the I, to the F, and the M Inoculation, Fermentation and Monitoring I. Scale- up Fermentation [Ampicillin and arabinose stock solutions are prepared and filter-sterilized] 1. After cooling down the medium broth to below 50˚C, Ampicillin and arabinose was added to a final concentration of 100ug/ml and of 0.2% respectively.
2. And the control parameters was set up as follows: Temperature - 32˚C pH - 7.5 Stirring speed - Minimum 10%, maximum 90% Control to AUTO pO2 Set Point - Set Point 20%, Control to AUTO Stir to CASC & AIRFLOW to CASC Airflow - Minimum 25%, Maximum 100% *Optimal GFP folding and fluorescence occur at 32˚C and below 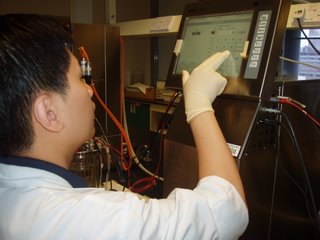 Luckily for us, the monitoring of the fermenter is done for us Luckily for us, the monitoring of the fermenter is done for usby machines. You simply have to set the ranges that would allow the bacteria to grow and the machine would keep all the Oxygen concentrations, pH levels, stirring speed, airflow and basically everything for you. Inoculated the fermenter with 100ml of seed culture [5% of fermentation medium volume]. Fermentation was left to be carried out for 24 hours at the conditions mentioned. Before inoculation was carried out, a 10ml blank sample was taken, Then took a sample of 10ml after every hour after. The fermentation broth harvested after 24 hours fermentation. Placed 10ml of culture into a sterile and disposable test tube. We have spoken.
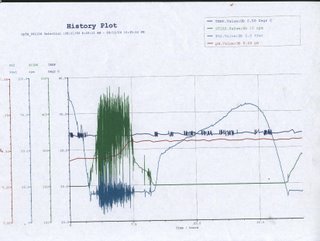
[Day 4]: Graph it OUT! After the fermentation process, the computer controling the fermentor has given us a analysis graph as shown below.
 Bear with him, he's kinda dragy. Temperature The temperature in the fermenter remains relatively constant throughout the whole process at about 32°C, with slight fluctuations at certain points. This is probably due to the cells’ metabolism that results in the production of heat as a byproduct. In order to keep the temperature as constant as possible, the reactor will try to cool down the temperature slightly, thus, creating the fluctuations PO2 From the history plot, the oxygen level in the fermenter starts high and rapidly decreases to a point where it starts to fluctuate greatly before returning gradually back to its original level and repeat the cycle again. As the bacteria culture was inoculated from a seed culture, there is very short or no lag phase at all, thus the initial dramatic decrease in oxygen level is an indication of the beginning of the log phase. During the log phase, cells actively metabolize and divide, resulting in an increasing demand in oxygen. As the bacteria cell population increases, so does the oxygen required. The fermenter system actively supply air into the fermenter through the sparger, this constant input and consumption of the oxygen is depicted by the great fluctuation on the history plot. As the log phase nears its end as a consequence of high cell density or accumulating waste product, the oxygen level becomes stable, marking the beginning of the stationary phase. During the stationary phase, rate of cell growth equals the rate of cell death and metabolic activity slows, thus the oxygen level remains fairly constant. Death phase begins when the oxygen level, indicated on the graph, starts to rise rapidly. Cell death occurs exponentially at this phase, oxygen level increase rapidly as demand decreases. However, the gradient of the graph decreases before it slope towards the peak, this is probably because the cells have entered a secondary growth (lag) phase in which the cells prepare for the next log phase. Little oxygen is needed at this point thus the continuing increase in oxygen level. The dramatic drop in oxygen level shows that the bacteria have entered the log phase again. Stir Oxygen introduced into the fermenter is to be evenly distributed so as to achieve a homogeneous environment, maximizing efficiency. This is done by an impeller that occupies the central column of the fermenter. The impeller works in coordination to the rate at which oxygen is pumped into the tank, the faster the rate at which oxygen in introduced, the faster the impeller would rotate. Thus, when the oxygen level starts to fluctuate greatly, so does the speed at which the impeller is rotating. pH A constant pH ensures that the bacteria are placed in optimum conditions. Drastic changes in pH would disrupt the structural stability of the bacteria and kill it. The pH, as observed from the graph, remains relatively constant in the beginning and increases slightly. This is due to the release of metabolic waste product by the bacteria into the environment, the slight change in pH does not trigger the system to counteract it . The constant pH is maintained by the fermenting system which automatically adds acid or alkaline when there is a pH change. Hydrochloric Acid (HCl) is not suitable as a correction agent for pH as the Chloride ions (Cl-) would probably kill the bacteria; instead sodium hydroxide (NaOH) and sulphuric acid (H2SO4) are used. We have spoken.
[Day 5] Prison Break 101: How to break a cell We get to the last part of the the whole project, where we get our product. FINALLY!!! What a long wait. Isolation Our product here is Green Fluorescent Protein which is an intracellular product. Therefore, in order to release the protein within the cell, cell disruption needs to be carried out. Three methods are performed in the experiment to lyse the bacteria cells.  10mL of the culture broth was collected into a tube  Method 1: Use of Enzymes  Method 2: Freezing and Thawing  Method 3: Sonication 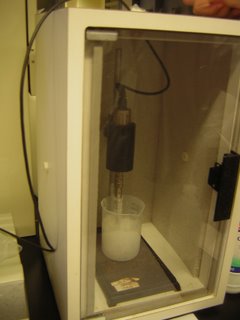 Carry out sonication by puting it on ice
We have spoken.
|
 |


 As a result, as the extract is poured into the column,
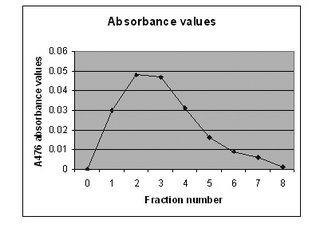 We use ammonium bicarbonate as the blank